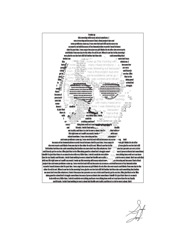
Jose Agustin Andreu
STUDENTS' WORK
2 Dimensional Design
Values
Text
Self Portrait Text
Click Image for Manual Slides
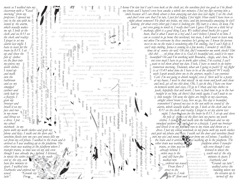
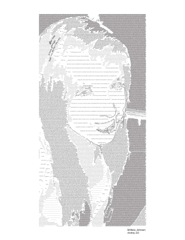
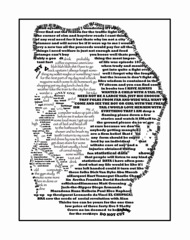
U10froemmling
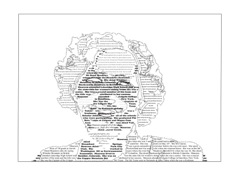
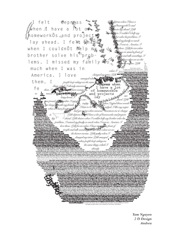
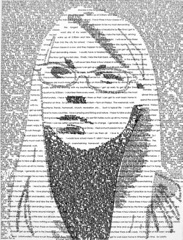
S10mathys
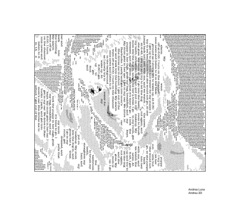
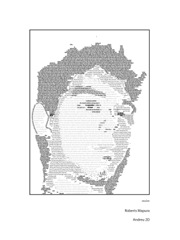
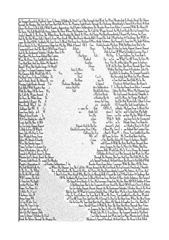
S10Luna
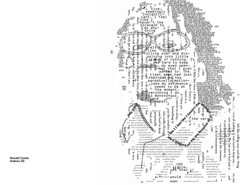
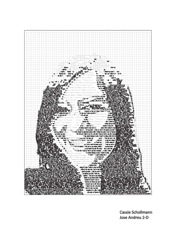
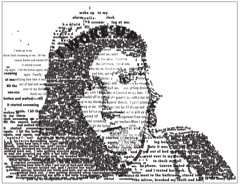
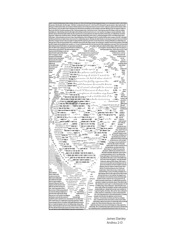
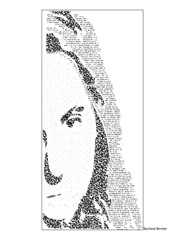
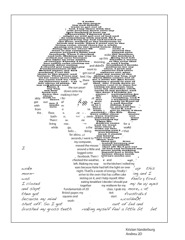
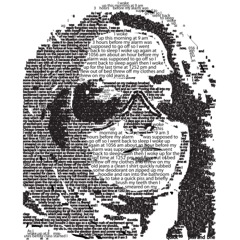
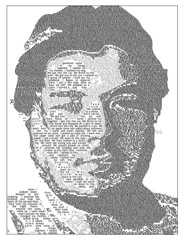
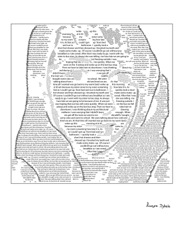
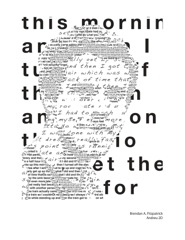
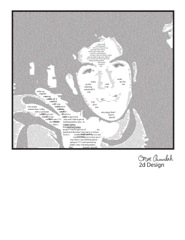
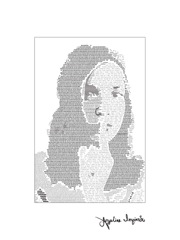
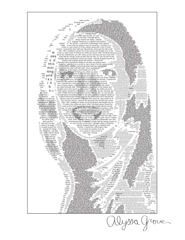
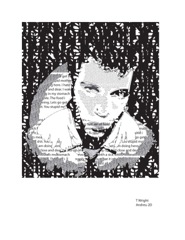
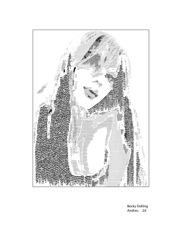
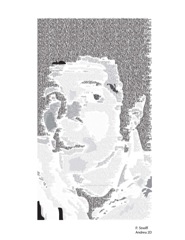
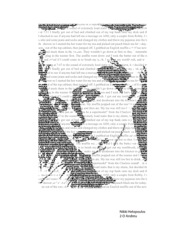
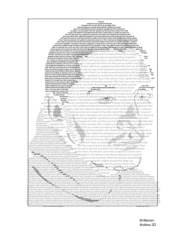
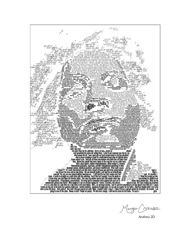
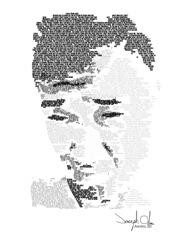
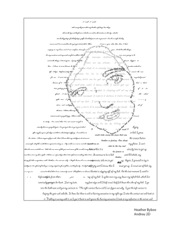
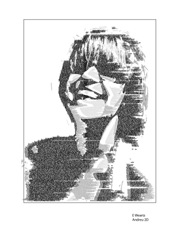
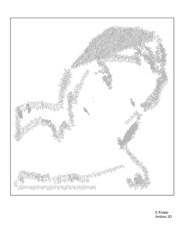
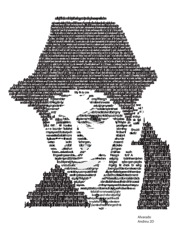
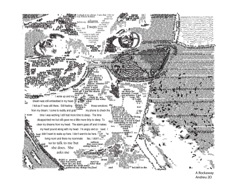
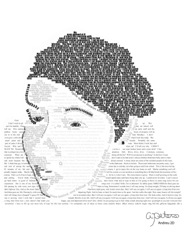
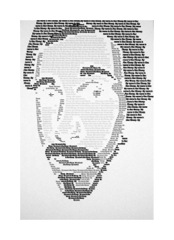
Trace a photograph of self into large and general shapes that keep the representational contours of the face. You can divide the value pattern of the photograph into three values, light, dark, and medium grey or five values that include black and white shapes. Fill the larger shapes or combination of shapes representing one value with one of the paragraphs. Fill the other value shapes with the other paragraph. If there is a third value you can repeat one of the paragraphs and change the text density to represent the third value. The rest of the image can be rounded out and detailed with linear text and manipulated fonts. Different fonts will give you different values due to their different densities. You can change the font size, kerning, tracking, leading, vertical and horizontal scaling to change the apparent text density. Recreate the volumes in your image with the fonts. The recreated image should be recognizable as your self as much as possible.
Submit digitally and Print and present in a format not larger than 11" and not wider than 8".
Mount on 16" x 12" Bristol with standard borders, 2" border on top and sides, 3" at bottom.
To Crop a Photo on Illustrator
Open a New document on Illustrator.
Give it a name such as 'lastnametextportrait1'.
Chose vertical letter format and RGB.
Go to File > Place and place the image of self on the document. Deselect.
Chose the Rectangle Tool and make Stroke black and Fill none.
Draw a frame around the part of the image to be used. Crop it as needed. Only the head tightly cropped is necessary but including the neck to the collar will make a better image.
Use the Free Transform Tool to adjust the frame proportions.
Drag Select both the image and the frame rectangle.
Go to Object > Clipping Mask > Make.
With the cropped image still selected, go to Object > Rasterize.
On the Rasterize Options Window set the Resolution to High, 300 ppi, and Click OK.
Go to File > Save and save a copy of your cropped image.
Duplicate the image
Make a new Layer to work in by clicking the Create New Layer at the bottom of the layers palette. It should appear at the top of the Layers palette.
Drag Select the image. Notice that a small color square appears next to the Layer Name in the Layers Palette when it is selected. It will also show up if it's in a group.
Click and, while holding the Option key, drag the little color square to the new layer. Wait till the arrow appears on the left before releasing and it will stay with a new color.
You now have a copy of the image in a new Layer. Click and dragging is a convenient way of moving objects between layers and groups.
Or
You can select the layer by clicking on the layer name and go to the Layers Option by clicking and holding the little black arrow at the upper right of the Layers palette and selecting Duplicate Layer. Double click on the new layer name to rename the layer.
Go back to the layer with the original image and click on the empty square to the left of the layer name to lock the layer and/or Click the Eye on/off next to the layer to temporarily hide or reveal the objects on that layer.
Now you can Live Trace or trace by hand the copy of the image.
To Live Trace
Drag Select the duplicate image
or click on the Radial Button on its layer in the Layers Palette.
On the Control Palette select the Tracing Options Dialogue
or Go to Object > Live Trace > Tracing Options.
Chose the preset grayscale with 6 colors.
Or select Tracing Options in the Control menu.
In the Tracing Options window under Adjustments and Mode chose Greyscale.
In the Max Colors chose a number between 3 to 6.
Select Preview and you can experiment with the various Thresholds and Adjustments.
Try other results by changing the Max Colors to 4, 2 or 5.
When satisfied with the results, click Trace.
Convert the tracing object into vector paths by clicking Expand.
With everything still selected go to Object > Ungroup to ungroup all shapes in the image.
Deselect all.
Go to File > Save and save a copy of your vectorized image.
Cleaning the results of Live Trace.
To simplify the areas of the drawing you can try these different methods.
Join paths to make more general shapes. Make several simpler shapes rather than a very large complex shape with branches. Closed shapes work, open shapes don't.
Direct Select fill shapes and paths to delete, transform them.
Remember that Stroke Paths and Fills have to be selected so that they can be edited with the Knife Tool and the Eraser Tool.
Direct Select points and join them by going to Object > Path > Join.
Direct Select a path to cut it with the Scissors Tool.
Also, you can Drag Select the portrait and go to Object > Path > Simplify.
In the Simplify dialogue window you can adjust the Curve Precision, the Angle Threshold and select to render in Straight Lines or to see the Original for comparison.
Also with everything selected go to Window > Pathfinder and
in the Pathfinder Palette select Trim or go to Effect > Pathfinder > Trim.
Adding Text
Create a new layer for each value. Title each layer.
Place all the fills and vector paths representing a value in their own layer.
Make a third Layer to work in by clicking the Create New Layer at the bottom of the layers palette. It should appear at the top of the Layers palette.
Select the layer with the vector drawing or vectorized image.
Direct Select a shape representing the darkest value to be substituted with text.
With the shape still selected go to Select > Same > Fill Color and it will select all the fills in the vectorized image that are the same value.
Notice that a small color square appears next to its Layer Name in the Layers Palette when it is selected. Click and drag the little color square to the new layer. Wait till the arrow appears on the left before releasing and it will stay with a new color.
Double click on the layer name and title it appropriately.
Repeat the procedure for each of the values represented in the image.
Once you have every fill and vector path representing a value in its own layer there should be a corresponding number of layers to the number of values.
Next you will separate each of the shapes of a particular value into two layers with the large shapes in the bottom layer and the small shapes in the upper layer.
Make and place a second layer below each of the value layers. Title each layer as a second version of its corresponding value, ie; black large, dark gray large, medium gray large, etc. To keep from being confused, turn off the eye on the layers palette for all but the two layers you will be working on at a time.
On the Artboard, Direct Select the largest value shapes in each layer. In the layers palette drag the large value shapes down to the second layer. Drag only the largest shapes to be filled with text. Leave the small detail shapes in the upper layer. The large shapes can be moved by Direct Selecting them and dragging the small square in the layers palette. You can turn the eye on and off to verify the results in each layer. Small shapes should be above large ones. Not all shapes need to be used only the ones needed to recreate the portrait. Shapes not to be used can be moved back into the upper layer should it become necessary. The small shapes will be held in reserve for detailing and elaboration as needed. The large shapes will be filled with text corresponding to the value in the image.
Repeat the procedure for each of the value layers. Once all value layers have each been separated into a layer with large shapes and a layer with small shapes, turn off the eye in all the small shape layers. We are ready to add text to the large shapes.
Select a large shape with the Area Type tool and click on a shape path.
Go to File > Place and select your text.
Once you place text into one of the outline shapes, if the text is longer than the space needs, you will get a little red square with a plus sign in it. It means that you have overflow text. Next use the Area Type Tool to select another closed outline shape and turn it into a text area shape. Then using the Selection Tool click twice on the little red square with the plus sign. The cursor will change to a paragraph icon. Click on the next text area. A chain icon will appear when hovering over the next text area. Click and the text will continue and fill the shape and, if the text is long enough, overflow again giving you another little red square with a plus sign. Repeat as necessary. If you run out of text, repeat the text by placing the paragraph again at the cursor.
In the view menu select Show Text Threads to view the sequence or select Hide Text Threads to hide the sequence.
Dealing with Compound Shapes
If the selected shape won't turn into a Type Area because it contains Compound Shapes you need to select it and go to Object > Compound Shape > Release.
That will make some shapes apparently disappear. They are still there but have lost their prescribed fill relationship. Select the larger shapes you want to fill with text and move them to a new layer. Select both layers with the leftover small shapes and merge them by going to the upper right corner of the Layers palette and selecting Merge. Make sure that the smaller shapes are in a layer above the layer with the larger shapes.
Adjust type sizes and styles to accommodate to the image.
Substitute the value in a shape by adjusting the manner text fills a shape.
Some type can be horizontal, other can be vertical or a different font and size.
Adjust the type by drag Selecting the type and going to Window > Type > Character and changing type relationships or Paragraph and changing justifications.
Or when the Type tool is selected use the Control window to access the Character, Type and Paragraph Options windows. Once some of the text in an Area is selected, you can
Select > All to select all the text in that area and change it.
You can make the lines closer or further apart horizontally or vertically, etc.
Try to get an accurate rendition of your image by changing the density of the text.
Fill the larger shapes or combination of shapes representing one value with one of the paragraphs. Fill the other value shapes with the other paragraph. If there is a third value you can repeat one of the paragraphs and change the text density to represent the third value.
Fill all the shapes with 2 to 4 densities of text to recreate the values in the original image.
The rest of the image can be rounded out and detailed with linear text and manipulated fonts.
Make paths on the edges of shapes and use the Vertical or Horizontal Type on Path tool.
You can select words or letters individually and change their size, style and properties.
Most importantly experiment and have Fun. Once you reach a satisfying resolution of the image, Save.
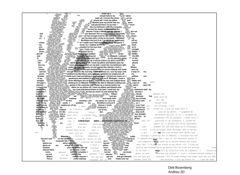
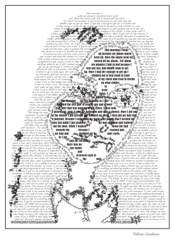
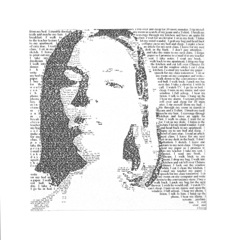
S10drosenberg
S10Cooks
F09Schollmann
F09DuBois
F09Danley
F09BJohnson
S09TNguyen
S09Mapura
S09cardenas
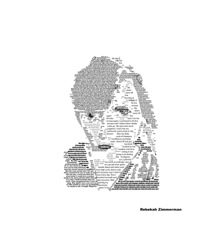
F08rzimmerman
F08SLopez
F08SKim
F08sgorecki
F08Rbernier
F08KVanderburg
F08KGendron
F08imorrison
F08dybala
F08bfitzpatrick
F08aweidah
F08AIzquierdo
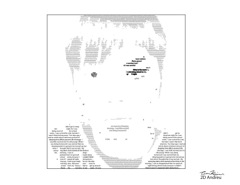
F08agrove
F07RWright
F07RDeking
F07PStreiff
F07NHelopoulos
F07MWarren
F07MCrouse

F07KFragakis
F07JOlson
F07HBybee
F07EWeartz
F07EKnapp
F07DAlvarado
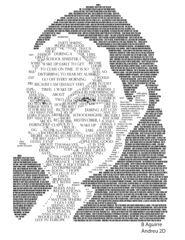
F07BAguirre
F07ARockway
F07APeters
S07AKinsey
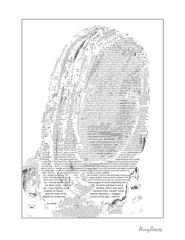
S07dcarlin
S07LShields
xx28
x08
Values
Text